Vue.js
Framework
Why Framework ?
In computing, the word framework can be translated literally as a “development foundation.” It refers to a set of practices, components, and tools used to structure and build a web project. The goal of a framework is to simplify and speed up development by providing ready-to-use functional blocks, such as database handling, user input security, or template creation.
A framework includes low-level features that can be used in most projects, no matter their theme or complexity.
Differences with a Library
A library is usually more specialized and focuses on a specific, higher-level task, such as building user interfaces, creating graphics, or performing data processing. At the end of the chapter, we will look at some functional libraries.
Framework
- It imposes a structure.
- It decides when and how your code is executed.
Library
- It’s a specialized toolbox.
- You call it only when you need it, with just a line of code
- You control when the library runs.
VUE.JS
The Vue.js framework (https://vuejs.org/), first released in 2013, has become very popular in recent years. Vue.js is a front-end framework used to build user interfaces, and it focuses on automatically updating the DOM. It lets you link elements in the page to JavaScript variables or objects, and it detects any changes to update the page automatically, without needing to write extra code or events.
Why choose Vue.js
- Vue.js is growing fast and probably hasn’t reached its maximum number of users yet. Its maturity, its community, and the quality of its documentation make it a reliable choice in the medium term.
- Vue.js is also designed to be added to existing projects gradually. If an application already exists, it is very easy to add new features using Vue.js without rewriting everything. Migration to Vue.js can be done step-by-step, without stopping the online service.
- You can use it in any environment, for example WordPress, Shopify…
- The optional use of reusable components makes it easier to build complex applications.
- Learning Vue.js is quick, thanks to its incremental design and immediate use without needing components. A few hours are enough to build a real working project. The framework is also powerful enough to support advanced applications.
Video : https://vuejs.org/
Vue.js version 3 released in 2020 just after the new version ES6 (ECMAScript) of Javascript
Frameworks or pure in-house development?
This question will never have a definitive answer. A framework structures projects and makes maintenance easier, even for a developer who joins the project without knowing it beforehand. A well-designed in-house development offers a smaller attack surface for hackers: if a security flaw is found in a framework’s source code, your site becomes vulnerable immediately. In all cases, security must remain a top priority for the company.
Installation VUE.JS
There are several ways to install it or integrate it into a project:
- CDN : the easiest and fastest for one-time needs in projects or for making a prototype
- vite
- Va créer des pages web en utilisant Vue.js en développement, mais après dans la production on n’a pas besoin de NodeJs ni de Vue
npm create vite@latest my-project -- --template vue
cd my-project
npm install
npm run dev
Real-world examples: "static" yet fully dynamic sites
Example 1: an event website (SPA)
- Vue Router → navigation without page reloads
- Components → event grid, carousel, details
- Fetch → remote API (Strapi, PHP, Node, etc.)
- SEO via prerender (if needed)
Example 2: student dashboard
- Interactive list
- Sorting, filtering, search
- Charts (Chart.js, ECharts)
- JWT login on the API side
Example 3: quiz application
- Component navigation
- Score tracking
- Timer
- Conditional rendering
- API calls to load questions
All of this runs very well in a SPA delivered as static files.
- Va créer des pages web en utilisant Vue.js en développement, mais après dans la production on n’a pas besoin de NodeJs ni de Vue
- Nuxt 4
- Complete framework, with page routing and different ways to add content in the page (static/dynamic), that integrates Vue.js
- Better suited for a web application
CDN
Content Delivery Network
What are CDN servers, and who owns them?
A CDN is made up of hundreds or thousands of servers located in datacenters all around the world.
1. The servers are owned by the companies that operate the CDN
Each CDN service has its own network of servers.
Here are the biggest ones:
Cloudflare
- Network: 300+ cities in 100+ countries
- Servers owned by: Cloudflare Inc.
- Specialties: security + web performance
Akamai
- Network: the largest CDN in the world
- Servers owned by: Akamai Technologies
- Specialties: streaming, enterprise delivery, large-scale infrastructure
Amazon CloudFront (AWS)
- Servers owned by: Amazon
- Integrated into AWS
Google CDN (gstatic, YouTube CDN)
- Servers owned by: Google
- Often tied to the YouTube/Google Cloud network
Microsoft Azure CDN
- Servers owned by: Microsoft
- Integrated into Azure
2. Where are these servers physically located?
In datacenters, often:
- in capital cities
- in high-traffic Internet zones
- in major network hubs (Amsterdam AMS-IX, Paris Th2, Frankfurt DE-CIX…)
These servers are called Points of Presence (PoPs).
3. Why are they spread everywhere?
To reduce latency.
The file is delivered from the server that is geographically closest to the user.
Example:
A user in Sevilla → receives the image from Madrid, not from a server in Paris.
4. Is this a security problem?
Not really, for several reasons:
- CDNs deliver non-sensitive files: images, JS, CSS, etc.
- Sensitive data (e.g., login credentials) never go through a CDN
- Major CDN providers are highly secure
- Many CDNs even offer protection (DDoS, WAF, etc.)
Installing Vue.js - Minimal usage
For a basic project, installing Vue.js simply means adding the source code in the <head> section of the HTML.
The development version, loaded directly from a CDN, includes debugging features:
Get the CDN URL here https://vuejs.org/guide/quick-start.html#using-vue-from-cdn
<script src="https://unpkg.com/vue@3/dist/vue.global.js"></script>Chrome devtools
Vue.js devtools on Chrome
Coding with Vue.js
Display Framework version
To verify that Vue.js is correctly integrated into the page, let's display the framework’s version number. It can be found in the Vue.version variable.
html page
        <section id="app">
        </section>

        <script src="app.js"></script>
    </body>
app.js file
const app = Vue.createApp({
    mounted() {
        console.log("Vue is ready");
        alert(`Vue.version = ${Vue.version}`);
    }
});

app.mount('#app');
const app = Vue.createApp({- Vue.createApp() is the way to create an application in Vue 3 (there is no longer new Vue() like in Vue 2).
- You provide a configuration object that describes:
- the data,
- the methods,
- the lifecycle hooks,
- etc.
const app therefore contains your Vue application.
mounted() : lifecycle hook
mounted() {
    console.log("Vue is ready");
    alert(`Vue.version = ${Vue.version}`);
}
mounted() means:
"This function runs automatically once Vue has finished displaying the interface in the browser."
It's an ideal moment to:
- fetch API data,
- fill the screen with dynamic information,
- start a timer,
- initialize a plugin, etc.
Here, you're doing a simple test:
- console.log() → displayed in the console,
- alert() → shows the loaded Vue version.
When can you trigger actions? (for example fetch action)
You can call fetch() in:
- mounted()
- a @click button
- a @change event
- a method called at any time
- a watcher
- a child component
app.mount(’#app’) : connection between Vue and the HTML
- mount() attaches your Vue application to a DOM element.
app.mount('#app');Reactive data
The essential of Vue.js
html page
        <section id="app">
            <h1>{{ title }}</h1>
            <p>{{ message }}</p>

             <button @click="changeMessage">
                Change the message
             </button>


        </section>
data() : reactive data
app.js file
const app = Vue.createApp({
    data() {
        return {
            title: "Titre 1",
            message: "Message 1"
        }
    },
    methods: {
        changeMessage() {
            this.message = "Hello world !";
        }
    }
});

app.mount('#app');- data() is a function that returns an object containing the variables.
- These variables are called reactive: ➜ if you modify this.title in your code, Vue automatically updates the HTML.
→ the <p> changes instantly.
That's what reactive means.
- Vue will replace the content of this element with its own rendering.
Counter
Dans data(), on déclare les données. Dans le code (methods, mounted, etc.), on accède à ces données via this.
app.js file
html file
        <section id="app">

            <div>count : {{count}}</div>


        </section>
const app = Vue.createApp({
data() {
return {
count: 0,
intervalId: null
}
},
mounted() {
this.intervalId = setInterval(() => {
console.log("this.intervalId = ",this.intervalId);
if (this.count >= 120) {
clearInterval(this.intervalId); // on stoppe le compteur
console.log("Compteur arrêté à 120");
return;
}
this.count += 1;
}, 1000);
},
});
app.mount('#app');Bookstore event web app
Exercise – BookStore Events : first form with Vue.js 3
Go from a static mockup to an interactive form using Vue.js 3 (CDN), data binding, and event handling.
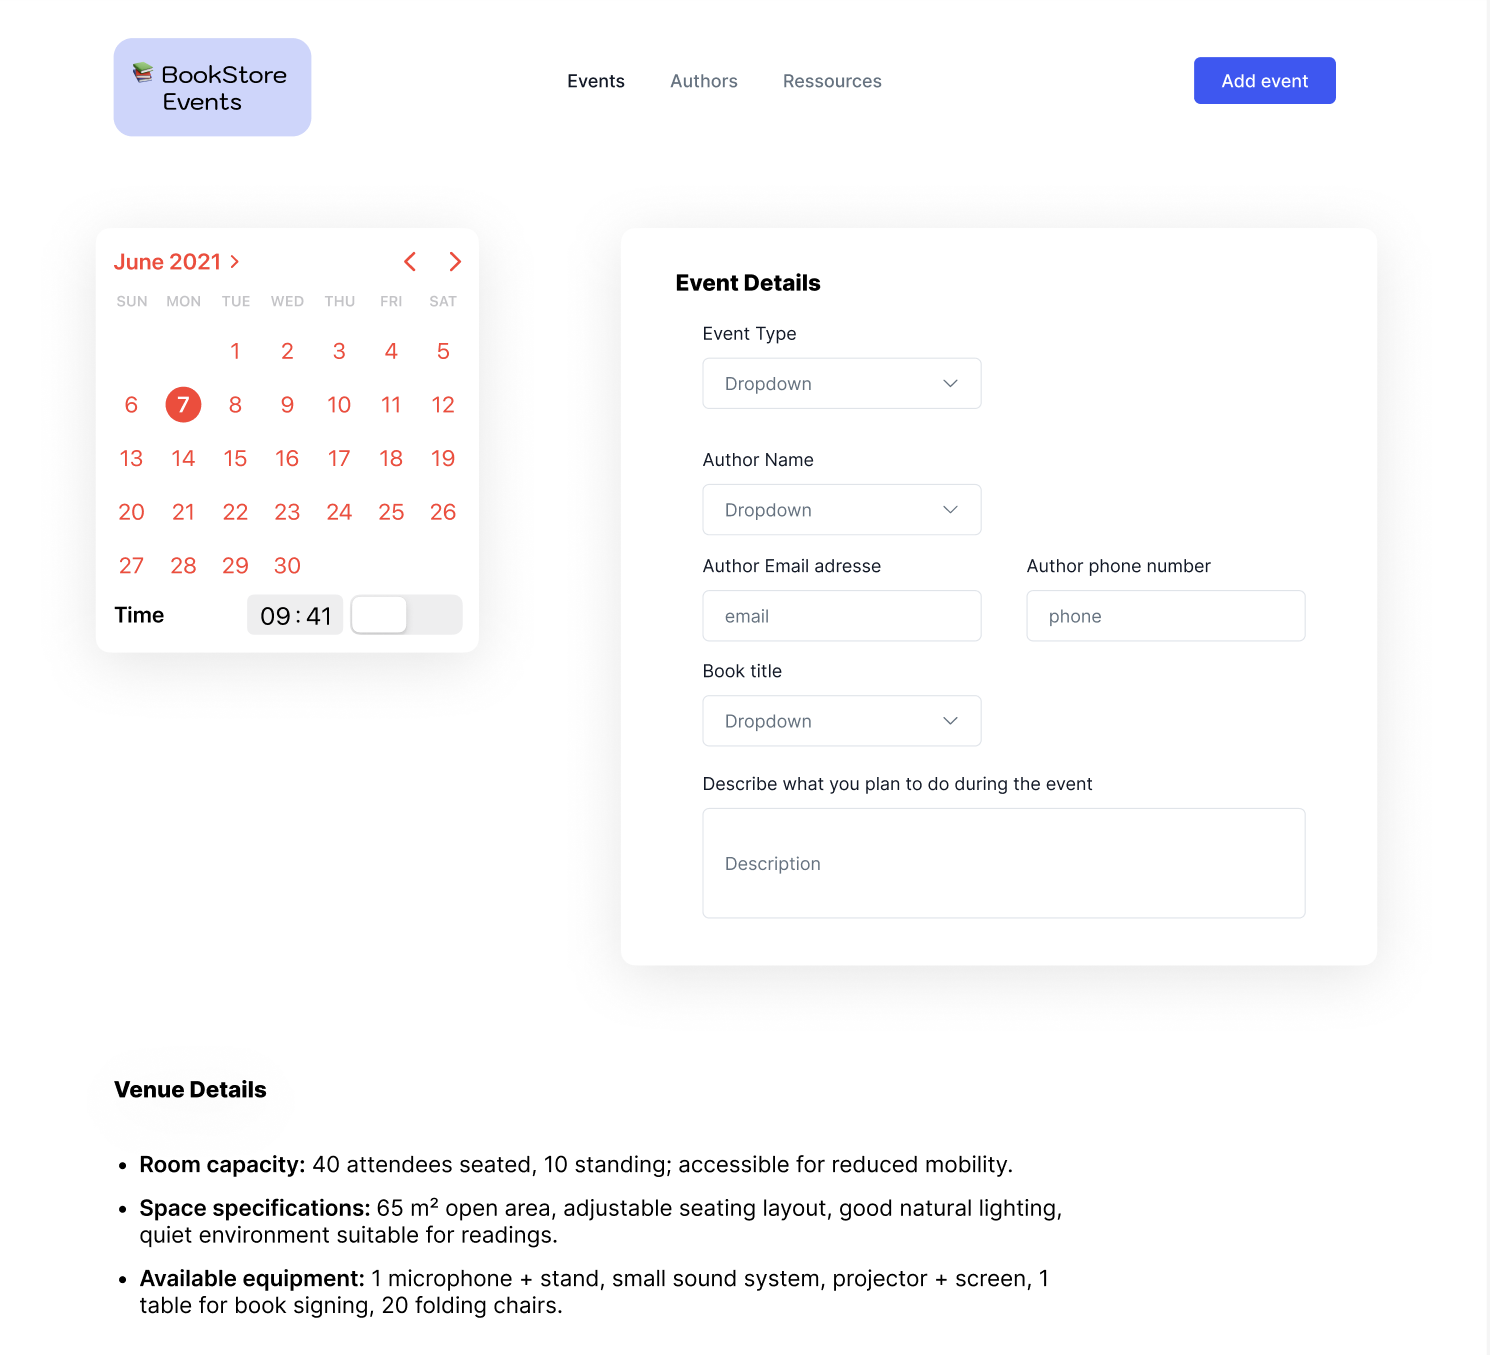
Step 1 — HTML Structure & Static Layout (without Vue)
- Create an index.html file and a style.css file.
- Reproduce the following page in HTML + CSS only:
- Header with:
- BookStore Events logo (emoji + text),
- navigation menu: Events, Authors, Resources,
- "Add event" button.
- Main area in two columns:
- on the left: "simplified calendar" block (title + date field + time field),
- on the right: "Event Details" block with the form (fields visible in the mockup).
- "Venue Details" section at the bottom, with a bulleted list (room capacity, space, equipment).
- Header with:
- At this stage, no JavaScript logic, only structure and styling.
Step 2 — Integrating Vue.js 3 (CDN) and basic test
- Add Vue.js 3 via CDN in the <head>
<script src="https://unpkg.com/vue@3/dist/vue.global.js"></script>- Add a Vue root container around your page (or the main block):
<div id="app">
  <!-- zone contrôlée par Vue -->
</div>- Create an app.js file and initialize a simple Vue 3 application:
const app = Vue.createApp({
  mounted() {
    alert(`Vue.version = ${Vue.version}`);
  }
});

app.mount('#app');
Call app.js in your HTML page
    <script src="app.js"></script>
</body>- Check in the browser that:
- the page loads,
- an alert displays the Vue version.
Step 3 — Making the form reactive with data() + v-model
- In app.js, declare an event object in data() containing:
const app = Vue.createApp({ data() { return { event: { date: "", time: "", type: "", author: "", email: "", phone: "", book: "", description: "" } }; }, mounted() { console.log(`Vue.version = ${Vue.version}`); } });- data() returns an object
- Vue makes all its properties reactive
- so event becomes:
this.event.date
this.event.time
this.event.type
...
usable in:
- the template <input v-model="event.email">
- methods
- mounted
- On each form field, replace the static value with a v-model binding:
- v-model="event.date" on the date field,
- v-model="event.time" on the time field,
- v-model="event.type" on the select Event Type,
- etc.
- For dropdown lists (Event Type, Author, Book), create arrays in data() (e.g. eventTypes, authors, books) and use v-for to generate the <optio
    <div id="app">
        <main class="main-layout">
            <!-- Left column : calendar  placeholder -->
            <section class="calendar-card">
                <h2>June 2021</h2>
                <div class="calendar-placeholder">
                Calendar placeholder
                </div>

                <label for="event-date">Pick a free day</label>
                <input id="event-date" type="date" v-model="event.date">

                <div class="time-picker">
                    <label for="event-time">Choose a time</label>
                    <input id="event-time" type="time" v-model="event.time">

                </div>
            </section>

            <!-- Right column: the “Event Details” -->
            <section class="event-card">
                <h2>Event Details</h2>
                <form class="event-form">

                    <div class="form-row">
                        <label for="event-type">Event Type</label>
                        <select id="event-type" v-model="event.type">
                            <option value="">-</option>
                            <option v-for="type in eventTypes" :key="type" :value="type">{{ type }}</option>
                        </select>
                    </div>

                    <div class="form-row">
                        <label for="author-name">Author Name</label>
                        <select id="author-name" v-model="event.author">
                            <option value="">-</option>
                            <option v-for="author in authors" :key="author" :value="author">{{ author }}</option>
                        </select>
                    </div>

                    <div class="form-row form-row-two-columns">
                        <div>
                            <label for="author-email">Author Email address</label>
                            <input type="email" id="author-email" v-model="event.email" placeholder="email">
                        </div>
                        <div>
                            <label for="author-phone">Author phone number</label>
                            <input type="text" id="author-phone" v-model="event.phone" placeholder="phone">
                        </div>
                    </div>

                    <div class="form-row">
                        <label for="book-title">Book title</label>
                        <select id="book-title" v-model="event.book">
                            <option value="">-</option>
                            <option v-for="book in books" :key="book" :value="book">{{ book }}</option>
                        </select>
                    </div>

                    <div class="form-row">
                        <label for="description">Describe what you plan to do during the event</label>
                        <textarea id="description" v-model="event.description" placeholder="Description"></textarea>
                    </div>

                    <!-- ✅ Submit button -->
                    <div class="form-row">
                        <button type="submit" class="btn-submit">Submit</button>
                    </div>

                </form>
            </section>

        </main>

        <pre>{{ event }}</pre>
    </div>
The
:means dynamic binding.:key="type"This is the unique identifier for each generated element. Vue needs to know which option corresponds to which element in order to optimize the DOM.
- Test in the browser with
<pre>{{ event }}</pre>
Step 4 — Handling submission: @submit.prevent + displaying data
- On the
<form>tag, add<form @submit.prevent="submitEvent">@submit= When this form is submitted.prevent= Intercepts the submission and prevents the page from reloading. Normally, a <form> reloads the page when you click "Submit". With .prevent, we automatically prevent this from happening.
- In methods, define submitEvent():
- Display a summary with console.table(this.event).
methods: {
  submitEvent() {
    console.log("Event payload :", this.event);
    alert(
      "Event saved:\n\n" +
      JSON.stringify(this.event, null, 2)
    );
  }
}
Step 5 - Get data from Database
➡️ Fetch authors, event types, and books from a database, asynchronously, and inject them into Vue.
- The page loads
- Vue starts
- mounted() calls the PHP script with fetch()
- PHP reads MySQL
- JSON is returned
- Vue updates authors, eventTypes, books
- The <select> elements auto-populate
- The form becomes dynamic
Simple architecture (Vue front-end + PHP/MySQL backend)
Vue does not talk to MySQL directly.
It talks to a PHP endpoint
2. PHP API (placed in /api/getData.php)
<?php
header("Content-Type: application/json");
header("Access-Control-Allow-Origin: *");

// MySQL connection
$pdo = new PDO("mysql:host=localhost;dbname=bookstore;charset=utf8", "root", "");

// Fetch authors
$stmt = $pdo->query("SELECT name FROM authors ORDER BY name");
$authors = $stmt->fetchAll(PDO::FETCH_COLUMN);

// Fetch event types
$stmt = $pdo->query("SELECT type_name FROM event_types ORDER BY type_name");
$types = $stmt->fetchAll(PDO::FETCH_COLUMN);

// Fetch books
$stmt = $pdo->query("SELECT title FROM books ORDER BY title");
$books = $stmt->fetchAll(PDO::FETCH_COLUMN);

// JSON response
echo json_encode([
    "authors" => $authors,
    "eventTypes" => $types,
    "books" => $books
]);
This file returns:
{
  "authors": ["Alice", "John Doe", "Mary Johnson"],
  "eventTypes": ["Reading", "Workshop", "Book signing"],
  "books": ["The Summer Garden", "Mystery in Paris"]
}
3. Vue: API call with fetch() inside mounted()
In your app.js:
mounted() {
  console.log("Vue ready:", Vue.version);

  fetch("<http://localhost/api/getData.php>")
    .then(response => response.json())
    .then(data => {
      this.authors = data.authors;
      this.eventTypes = data.eventTypes;
      this.books = data.books;

      console.log("Data loaded from backend:", data);
    })
    .catch(error => {
      console.error("Error loading lists:", error);
    });
}
4. Declare empty arrays in data() (they will be filled later)
data() {
  return {
    event: {
      type: "",
      author: "",
      email: "",
      phone: "",
      book: "",
      description: ""
    },

    authors: [],
    eventTypes: [],
    books: [],
  }
}